


![]()
![]()
![]()
Tips:
- Use a soda straw to lift off wet glue; , as you push it along a corner with glue squeezings it will form to the corner and the glue goes into the straw instead of smearing.
- Keep a damp rag and a dry rag handy to clean up excess glue
- Use waxed paper to keep sub-assemblies from gluing to the counter
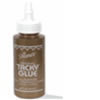
Favorite: Aleene's Original Tacky Glue (in the Bronze bottle) for dollhouse construction
![]()
Masking Tape: I use lots of masking tape when I build a dollhouse, even a whole roll. I sometimes build an entire dollhouse with nothing but glue and masking tape
Tips:
- Use long pieces of tape, 9 - 12". Use several pieces for each corner you are pulling together
- Start a ways away from the corner and rub down 3 - 4" of the end of the tape. Now stretch the tape as you wrap it around the corner. Rub down the whole piece of tape
- For a really difficult corner, pull out a long piece of tape (3 feet?) and rub down one end. Now pull out another and rub down the end on top of the first piece. Grab both pieces and pull them together to straighten or tignten the parts.
- "Box" a corner with 3 pieces of tape, one from the side to the bottom, one from the bottom to the front, one from the front to the side. A boxed corner is stiff and won't slip
Favorite: 3/4" Scotch Contractors tape... select a tape that lists "high tack" or "strong adhesive"
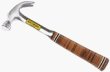
Hammer: Pound it, bang it, hammers make things move. On a good day, my hammer drives nails. On other days, I pound on parts to get them to fit better or to tear them apart.
Tips:
- Lightly sand the striking surface to keep the head from sliding off the nail, which bends the nail
- Do not drive the nail all the way in. Check to be sure it hasn't gone crooked while some of it sticks up so you can pull it back out
- Use an awl or nail-set for the last little bit so you won't dent the surface
- Use a piece of scrap to protect the surface when pounding parts to make them fit
- Use a piece of scrap to protect the surface when using a hammer to pull out a nail
Favorite: Estwing makes a 12 oz hammer that is beautiful for dollhouse building
![]()
![]()
Screwdriver: Top is "regular" or "slotted", and bottom is "phillips". Screwdrivers come in many sizes; most dollhouse screws use #1 slotted, #2 phillips for "some assembly required" dollhouses, and #0 or #00 phillips for hinges
Tips: (see this blog)
- Dollhouse screws are tiny and un-forgiving. Take the screws you have to the hardware store and get a new screwdriver that fits the screws
- Punch a hole with a nail or drill before starting the screw
- If a screw is too tiny to hold, use tweezers or stick the screw through a piece of paper to hold it
- Start the screw with a hammer
- Do not overtighten... it will strip the screw (then you will have to glue it in)
Favorite: Test your screwdriver with the screw you are going to use

Measuring: I use a measuring tape for many things, but a great big yardstick (wide and stiff) and a little tiny machinist's ruler are handy sometimes too
Tips:
- If you are using a school ruler, the measuring doesn't start at the end. There's always a little blank space that will throw off your measurements
- Use a wide stiff yardstick to draw lines (shingle guidelines or scoring a floor)
- Rather than measure, consider using a transfer paper or a transfer stick to mark out measurements
- Never believe your measurements. Always re-check
- American rulers are mostly in inches, 1/2" (one half inch), 1/4" (one quarter inch), 1/8" (one eighth inch), 1/16" (one sixteenth inch), etc. so a measurement might be: 6 3/16" (six and three sixteenths inches) more about inch-fractions (making sense of parts list measurements)
Favorite: I keep a 6 foot by 1/4" wide tape measure in my pocket all the time
![]()
Nail Set: Drive in the last little bit of the nail with a nail set so the hammer won't dent the surface
Tips:
- Keep the end of the nail set sharp and square
- It is tempting to use any old nail or screwdriver for a nail set... I usually regret it
- I do use an awl for a nail set on the smallest brads
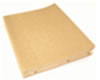
Sandpaper: Smoothing, shaping, de-burring, and getting rid of roughness between coats of paint
Tips:
- Good sandpaper is sharp and new. Use Aluminum Oxide, Silicon Carbide, or Garnet paper
- Use 100 or 120 grit for smoothing wood surfaces and edges
- Use 320 grit for sanding between coats of paint
- Have several sheets of each grit on hand when you begin your dollhouse
- Always, always sand down to the wood after the first coat!!!
Favorite: Klingspor Aluminum Oxide 320 grit
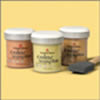
Painting: High quality semi-gloss latex enamel
Tips:
- The first coat of paint raises the grain and leaves the surface rough; sand between coats with 320 grit aluminum oxide sandpaper
- Take the time to sand each surface and in the tiny details individually; a great paint job has no feathers and roughness
- If you are painting over an unknown paint, sand off any gloss and start with a coat of alkyd primer
- Old paintbrushes are not an asset; use new foam brushes for wide spaces and natural brissle artist's brushes (sable, etc) for fine detail
- The body of a moderate dollhouse may use a pint of paint. Choose colors schemes that use standard colors (available pre-mixed in small quantities) or use craft paints for the details.
Favorite: Benjamin Moore interior semi-gloss latex (or Behr)